As I said in my last post about CMake, targets are everything in CMake. Unfortunately, not everything is a target though!
If you’ve tried do anything non-trivial in CMake using the add_custom_command() command, you may have got stuck in this horrible swamp of confusion. If you want to generate some kind of file at build time, in some manner other than compiling C or C++ code, then you need to use a custom command to generate the file. But files aren’t targets and have all sorts of exciting limitations to make you forget everything you ever new about dependency management.
What makes it so hard is that there’s not one limitation, but several. Here is a hopefully complete list of things you might want to do in CMake that involve custom commands and custom targets depending on each other, and some explainations as to why things don’t work the way that you might expect.
1. Dependencies between targets
 This is CMake at its simplest (and best).
cmake_minimum_required(VERSION 3.2)
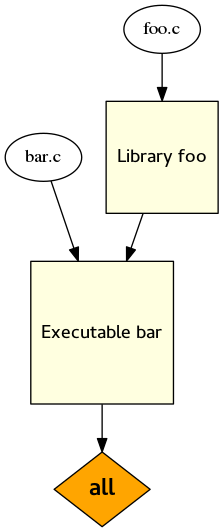
add_library(foo foo.c)
add_executable(bar bar.c)
target_link_libraries(bar foo)
You have a library, and a program that depends on it. When you run CMake, both of them get built. Ideal! This is great!
What is “all”, in the dependency graph to the left? It’s a built in target, and it’s the default target. There are also “install” and “test” targets built in (but no “clean” target).
2. Custom targets
If your project is a good one then maybe you use a documentation tool like GTK-Doc or Doxygen to generate documentation from the code.
This is where add_custom_command() enters your life. You may live to regret ever letting it in.
cmake_minimum_required(VERSION 3.2)

add_custom_command(
    OUTPUT
        docs/doxygen.stamp
    DEPENDS
        docs/Doxyfile
    COMMAND
        doxygen docs/Doxyfile
    COMMAND
        cmake -E touch docs/doxygen.stamp
    COMMENT
        "Generating API documentation with Doxygen"
    VERBATIM
    )
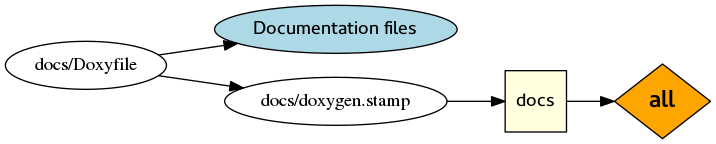
We have to create a ‘stamp’ file because Doxygen generates lots of different files, and we can’t really tell CMake what to expect. But actually, here’s what to expect: nothing! If you build this, you get no output. Nothing depends on the documentation, so it isn’t built.
So we need to add a dependency between docs/doxygen.stamp and the “all” target. How about using add_dependencies()? No, you can’t use that with any of the built in targets. But as a special case, you can use add_custom_target(ALL) to create a new target attached to the “all” target:
add_custom_target(
    docs ALL
    DEPENDS docs/doxygen.stamp
    )
In practice, you might also want to make the custom command depend on all your source code, so it gets regenerated every time you change the code. Or, you might want to remove the ALL from your custom target, so that you have to explicitly run make docs to generate the documentation.
This is also discussed here.
3. Custom commands in different directories
Another use case for add_custom_command() is generating source code files using 3rd party tools.
### Toplevel CMakeLists.txt
cmake_minimum_required(VERSION 3.2)

add_subdirectory(src)
add_subdirectory(tests)


### src/CMakeLists.txt
add_custom_command(
    OUTPUT
        ${CMAKE_CURRENT_BINARY_DIR}/foo.c
    COMMAND
        cmake -E echo "Generate my C code" > foo.c
    VERBATIM
    )


### tests/CMakeLists.txt
add_executable(
    test-foo
        test-foo.c ${CMAKE_CURRENT_BINARY_DIR}/../src/foo.c
    )

add_test(
    NAME test-foo
    COMMAND test-foo
    )
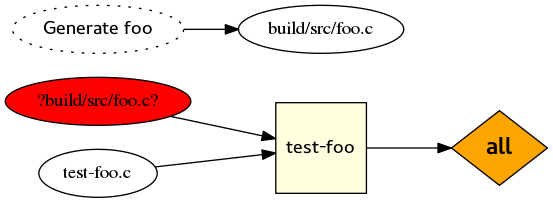
How does this work? Actually it doesn’t! You’ll see the following error when you run CMake:
CMake Error at tests/CMakeLists.txt:1 (add_executable):
  Cannot find source file:

    /home/sam/point3/build/src/foo.c

  Tried extensions .c .C .c++ .cc .cpp .cxx .m .M .mm .h .hh .h++ .hm .hpp
  .hxx .in .txx
CMake Error: CMake can not determine linker language for target: test-foo
CMake Error: Cannot determine link language for target "test-foo".
Congratulations, you’ve hit bug 14633! The fun thing here is that generated files don’t behave anything like targets. Actually they can only be referenced in the file that contains the corresponding add_custom_command() call. So when we refer to the generated foo.c in tests/CMakeLists.txt, CMake actually has no idea where it could come from, so it raises an error.
As the corresponding FAQ entry describes, there are two things you need to do to work around this limitation.
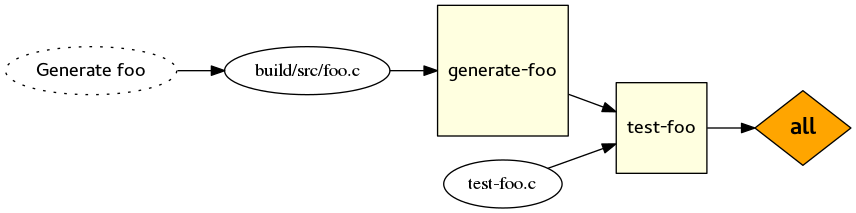
The first is to wrap your custom command in a custom target. Are you noticing a pattern yet? Most of the workarounds here are going to involve wrapping custom commands in custom targets. In src/CMakeLists.txt, you do this:
add_custom_target(
    generate-foo
    DEPENDS ${CMAKE_CURRENT_BINARY_DIR}/../src/foo.c
    )
Then, in tests/CMakeLists.txt, you can add a dependency between “test-foo” and “generate-foo”:
add_dependencies(test-foo generate-foo)
That’s enough to ensure that foo.c now gets generated before the build of test-foo begins, which is obviously important. If you try to run CMake now, you’ll hit the same error, because CMake still has no idea where that generated foo.c file might come from. The workaround here is to manually set the GENERATED target property:
set_source_files_properties(
    ${CMAKE_CURRENT_BINARY_DIR}/../src/foo.c
    PROPERTIES GENERATED TRUE
    )
Note that this is a bit of a contrived example. In most cases, the correct solution is to do this:
### src/CMakeLists.txt
add_library(foo foo.c)

### tests/CMakeLists.txt
target_link_libraries(test-foo foo)
Then you don’t have to worry about any of the nonsense above, because libraries are proper targets, and you can use them anywhere.
Even if it’s not practical to make a library containing ‘foo.c’, there must be some other target that links against it in the same directory that it is generated in. So instead of creating a “generate-foo” target, you can make “test-foo” depend on whatever other target links to “foo.c”.
4. Custom commands and parallel make
I came into this issue while doing something pretty unusual with CMake: wrapping a series of Buildroot builds. Imagine my delight at discovering that, when parallel make was used, my CMake-generated Makefile was running the same Buildroot build multiple times at the same time! That is not what I wanted!
It turns out this is a pretty common issue. The crux of it is that with the “Unix Makefiles” backend, multiple toplevel targets run as an independent, parallel make processes. Files aren’t targets, and unless something is a target then it doesn’t get propagated around like you would expect.
Here is the test case:
cmake_minimum_required(VERSION 3.2)

add_custom_command(
    OUTPUT gen
    COMMAND sleep 1
    COMMAND cmake -E echo Hello > gen
    )

add_custom_target(
    my-all-1 ALL DEPENDS gen
    )

add_custom_target(
    my-all-2 ALL DEPENDS gen
    )
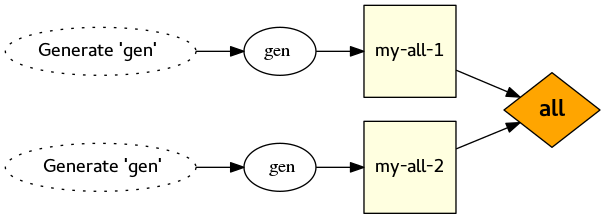
If you generate a Makefile from this and run make -j 2, you’ll see the following:
Scanning dependencies of target my-all-2
Scanning dependencies of target my-all-1
[ 50%] Generating gen
[100%] Generating gen
[100%] Built target my-all-2
[100%] Built target my-all-1
If creating ‘gen’ takes a long time, then you really don’t want it to happen multiple times! It may even cause disasters, for example running make twice at once in the same Buildroot build tree is not pretty at all.
As explained in bug 10082, the solution is (guess what!) to wrap the custom command in a custom target!
add_custom_target(make-gen DEPENDS gen)
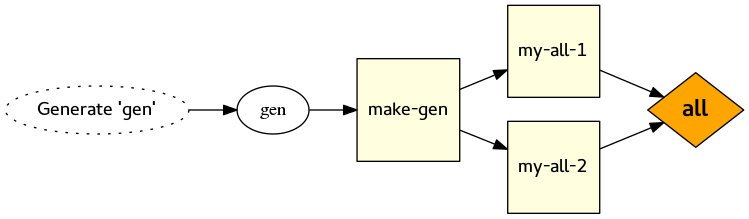
Then you change the custom targets to depend on “make-gen”, instead of the file ‘gen’. Except! Be careful when doing that — because there is another trap waiting for you!
5. File-level dependencies of custom targets are not propagated
If you read the documentation of add_custom_command() closely, and you look at the DEPENDS keyword argument, you’ll see this text:
If DEPENDS specifies any target (created by the add_custom_target(), add_executable(), or add_library() command) a target-level dependency is created to make sure the target is built before any target using this custom command. Additionally, if the target is an executable or library a file-level dependency is created to cause the custom command to re-run whenever the target is recompiled.
This sounds quite nice, like more or less what you would expect. But the important bit of information here is what CMake doesn’t do: when a custom target depends on another custom target, all the file level dependencies are completely ignored.
Here’s your final example for the evening:
cmake_minimum_required(VERSION 3.2)

set(SPECIAL_TEXT foo)

add_custom_command(
    OUTPUT gen1
    COMMAND cmake -E echo ${SPECIAL_TEXT} > gen1
    )

add_custom_target(
    gen1-wrapper
    DEPENDS gen1
    )

add_custom_command(
    OUTPUT gen2
    DEPENDS gen1-wrapper
    COMMAND cmake -E copy gen1 gen2
    )

add_custom_target(
    all-generated ALL
    DEPENDS gen2
    )
This is subtly wrong, even though you did what you were told, and wrapped the custom command in a custom target.
The first time you build it:
Scanning dependencies of target gen1-wrapper
[ 50%] Generating gen1
[ 50%] Built target gen1-wrapper
Scanning dependencies of target all-generated
[100%] Generating gen2
[100%] Built target all-generated
But then touch the file ‘gen1’, or overwrite it with something other text, or change the value of SPECIAL_TEXT in CMakeLists.txt to something else, and you will see this:
[ 50%] Generating gen1
[ 50%] Built target gen1-wrapper
[100%] Built target all-generated
There’s no file-level dependency created between ‘gen2’ and ‘gen1’, so ‘gen2’ never gets updated, and things get all weird.

You can’t just depend on gen1 instead of gen1-wrapper, because it may end up being built multiple times! See the previous point. Instead, you need to depend on the “gen1-wrapper” target and the file itself:
add_custom_command(
    OUTPUT gen2
    DEPENDS gen1-wrapper gen1
    COMMAND cmake -E copy gen1 gen2
    )
As the documentation says, this only applies to targets wrapping add_custom_command() output. If ‘gen1’ was a library created with add_library, things would work how you expect.

Conclusion
Maybe I just have a blunt head, but I found all of this quite difficult to work out. I can understand why CMake works this way, but I think there is plenty of room for improvement in the documentation where this is explained. Hopefully this guide has gone some way to making things clearer.
If you have any other dependency-related traps in CMake that you’ve hit, please comment and I’ll add them to this list…


